Windows triggers a Preparing Automatic Repair loop when the operating system fails to boot successfully and the built-in diagnostic utility cannot resolve the underlying error. It can indicate anything from storage media failure (which is where we usually get involved) or corrupt boot data.
To fix the loop, you will need to access Advanced Startup Options or repair the Boot Configuration Data (BCD). With that said, if the drive contains essential data (and you don’t have an up-to-date backup), we strongly advise powering off the device immediately.
Why? A persistent repair loop often signals a physical hardware issue or significant file system corruption. In our laboratories, we frequently see cases where a failing hard drive or solid-state drive (SSD) attempts to repair itself, only to cause further damage to the magnetic platters or NAND flash memory through repeated read/write attempts.
If your data is critical, the safest choice is to leave the machine powered off and consult a professional. If you have a current backup and wish to attempt a fix, read on for a few steps that could bypass the cycle.
At Datarecovery.com, we help consumers and enterprises recover from data loss disasters. With real laboratories in every location and our no data, no charge guarantee, we’re ready to provide solutions.
If you need professional assistance to recover files from a non-booting system, call 1-800-237-4200 or submit a case online for a free evaluation.
Determining the Root Cause of the Loop
The Automatic Repair tool is designed to fix boot issues automatically, but it requires a stable environment to function. When the software encounters a barrier it cannot overcome — such as a missing system registry hive or failing drive sectors — it restarts the process. Then, it encounters the same issue and restarts the process again.
Common triggers for this behavior include:
- Hard Drive or Solid State Drive Failure: Physical degradation of the storage media. Note that storage device failure doesn’t always have physical symptoms (such as the famous click of death); in some cases, the HDD/SSD may appear to operate normally.
- Corrupted BCD: Errors in the configuration file that tells Windows how to start.
- Registry Corruption: Damage to the internal database that stores system settings.
- Incompatible Updates: Recent Windows updates that did not install correctly.
Continuous power cycles while a drive is in a failing state can lead to permanent data loss. We can’t stress this enough: If you hear clicking, grinding, or whirring sounds, do not attempt the steps below.
Repeatedly cycling the power to a drive can cause scoring on the magnetic platters that hold your data. Once those platters are damaged, data recovery isn’t possible. The photo on the right side of this page shows a hard drive with extreme platter damage.
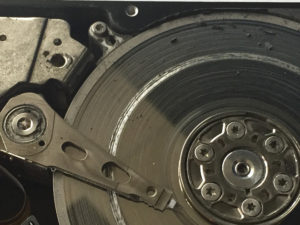
This hard drive shows rough platter damage where the head remained in contact with the platters for several hours of operation.
Bypassing the Windows Automatic Repair Loop
When the data on the drive is not a priority (or is already safely stored elsewhere), you can use the following methods to attempt a system recovery. Most of these methods involve entering the Windows Recovery Environment (WinRE).
1. Perform a Hard Power Cycle
Sometimes a simple hardware reset can work wonders.
- Hold the power button down until the machine shuts off completely.
- Disconnect the power cable (and remove the battery if you are using a laptop with a removable battery).
- Press and hold the power button for 30 seconds to drain any residual electricity.
- Reconnect the power source and attempt to boot normally.
2. Access the Windows Recovery Environment
If the hard reboot fails, you’ll need to access the Advanced Options menu. Windows usually triggers this menu automatically after three failed boot attempts.
- Power the computer on and off three times in a row as soon as the Windows logo appears.
- Wait for the Choose an option screen to appear.
- Select Troubleshoot followed by Advanced options.
3. Use the Command Prompt to Repair Boot Files
Corrupted boot configuration files can cause a boot loop. You can attempt a basic repair using the Command Prompt within the Advanced options menu.
- Open the Command Prompt from the recovery menu.
- Input commands to rebuild the BCD (refer to Microsoft’s official support documentation for the specific command syntax — it’s dependent on your version of Windows, and we’re writing this article to cover as many situations as possible).
- Run the chkdsk utility to identify and soft-fix file system errors.
Once again, note that running any software (and especially chkdsk) can cause permanent data loss. Only take these steps if you do not need to recover data (or you’ve got a recent enough backup that you could recreate the data if absolutely necessary).
4. Disable Automatic Repair at Startup
If the system is actually healthy but the repair tool itself is glitching, you can force Windows to ignore the repair utility.
- Navigate back to the Command Prompt in the recovery menu.
- Enter the command to disable the recoveryenabled flag in the boot loader.
- Restart the computer to see if Windows bypasses the loop and boots to the desktop.
Professional Data Recovery for Hard Drives and SSDs
Software-based fixes will not work if the underlying issue is a hardware problem. If the steps above do not resolve the loop — or if the system becomes increasingly sluggish — you may have a hardware problem.
If you have lost access to your files due to a boot loop or system failure, we are here to help. Contact us at 1-800-237-4200 or set up a risk-free evaluation online.


